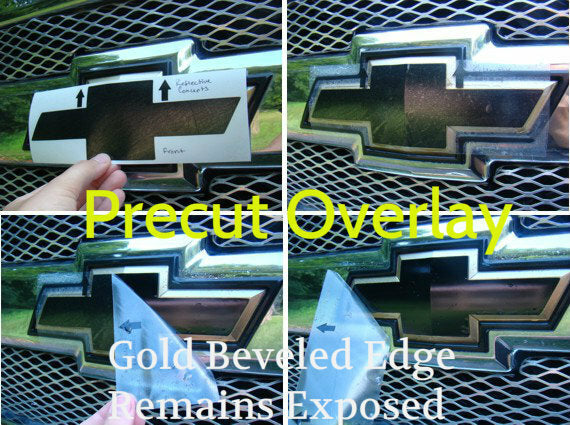
Blend in the bowtie or brighten it up with these precision-cut decals. This is a vinyl decal designed to over lay the existing Bowtie on the front.
Note: Due to the nature of the design of the factory bowtie, you will still see the gold edge on the bowtie.
This decal covers the front flat surface only.
Applications: (select from the drop-down menu below)
- 2002-2005 TrailBlazer - All Trims
- 2006-2009 TrailBlazer LS, LT
- 2006-2009 TrailBlazer SS
Product Installation Instructions
General suggestions for the installation:
1. We recommend washing the entire car first. Next, clean the application areas (badges, indents, etc…) with rubbing alcohol several times to remove any other oil or dirt. Q-Tips help with cleaning out crevices. Be sure there is no alcohol or water on the badge during the decal application.
2. For best results, work in a relatively warm, dry area and allow the working surface to change to the room temperature before application. It's recommended to work in 50 ° F or warmer) temperatures.
3. Before peeling off the backing, check the positioning.
4. When applying, work from top to bottom or left to right, holding the unapplied material away from the surface. Most colors (except Black and Lemon Yellow) will stretch a bit if absolutely necessary.
5. After Application, be sure to press the labels down firmly to ensure no air bubbles get trapped and to make sure the adhesive sticks. It's critical that you rub down the whole decal firmly to activate the adhesive and let the decal sit for at least 15 minutes before removing the mask (if it has one).
6. Try to let the adhesive set for 24 hours before washing the car again after decal application.
Product-specific recommendations:
Bowtie Overlay Decal (front/Rear)
This is a challenging decal to apply, so please take your time!
• The decal is sandwiched between the mask (clear cover) and the backing. Keep the arrow pointing UP.
• Carefully peel away the backing. Line the decal up over the emblem by looking through the mask. Be careful not to let the decal touch the surface until you are ready to apply.
• Run your finger down the center crease of the bowtie while holding either side with your other hand. Try not to let the left-most and right-most sections of the decal touch the emblem quite yet.
• CAREFULLY start working the decal to one side by pressing firmly, being sure all air bubbles are being removed. Try not to crease the decal when you're applying it.
• You cannot lift up on the decal once it's down, otherwise, it will distort the vinyl and color of it, so apply slowly and carefully.
• If you do get air bubbles, press firmly to try to remove, or you may pop them with a small pin and press to work them out.
• If you ordered a border color, apply the one that says BORDER FIRST using the above directions. Apply the FOREGROUND next, centering it over the border color (using the above directions).
• Line the decal up over the arrowhead. Be careful not to let the decal touch the badge until you are ready to apply.
• Once you are certain on where you'd like to apply it, press lightly around the edges and center of the Domed arrowhead, but be careful not to put too much pressure on it.